Flare-on 2015 - Level 2: very_success.exe
This post is mostly a showcase of possible approaches and excellent, free tools that you can use to reverse some binaries. To that end, we’ll leave the IDA alone, and learn a few new things. Along the way we’ll try out some frameworks and tools that will allows us to symbolically execute (angr), emulate (unicorn), and perform a side-channel attack (pintool) on the code we uncover.
Our target is the second challenge of Flare-On 2015. It is actually quite an interesting little target.
Let’s get right into it.
We’re going to grab a copy of radare2 for windows (pre-built for minimum hassle), and ConEmu to make our cmd prompt experience a little nicer.
After adding the folder containing radare to our path:
$ set PATH=%PATH%;C:\tools\r2
…we load the binary using the -A flag which performs an analysis of flags and symbols and renames things. We also use the -w flag to open the file in write mode in case we want to edit/patch something.
$ radare2 -A -w very_success.exe

Step 1: Initial triage and recon
We can perform our initial triage inside of r2:
What is this file?
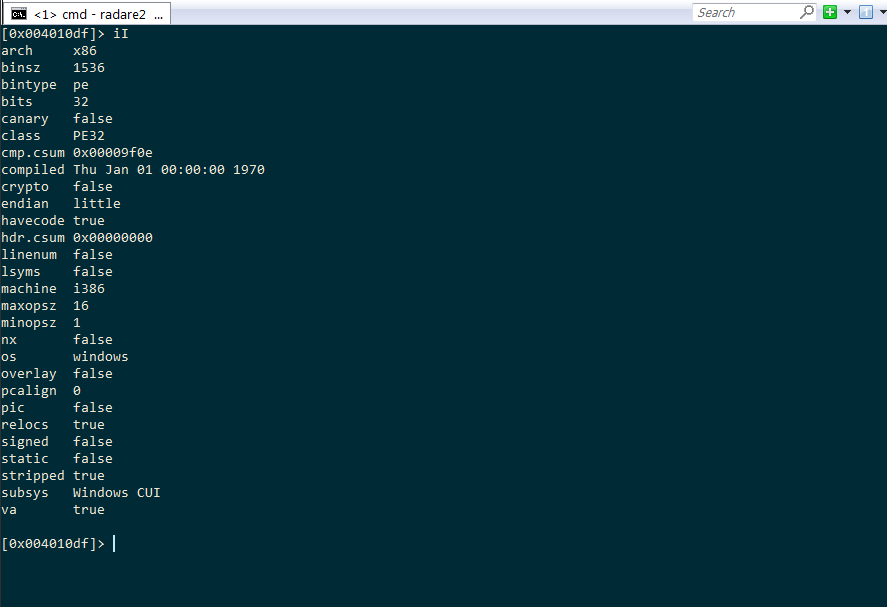
Ok, let’s see the entry points, imports, resources, sections, and exports:
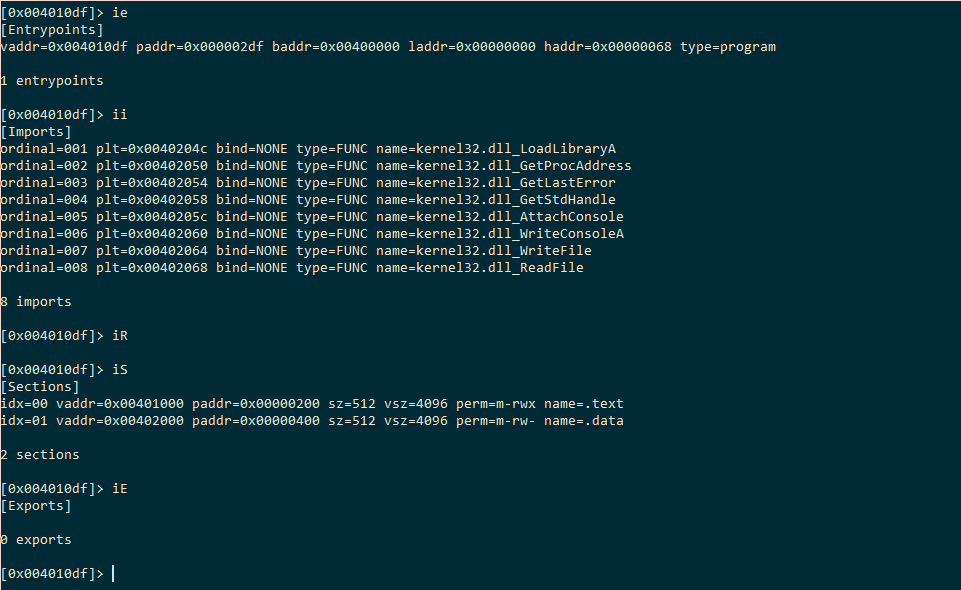
It’s looking like a small, simple thing so far…what kind of interesting strings are there?
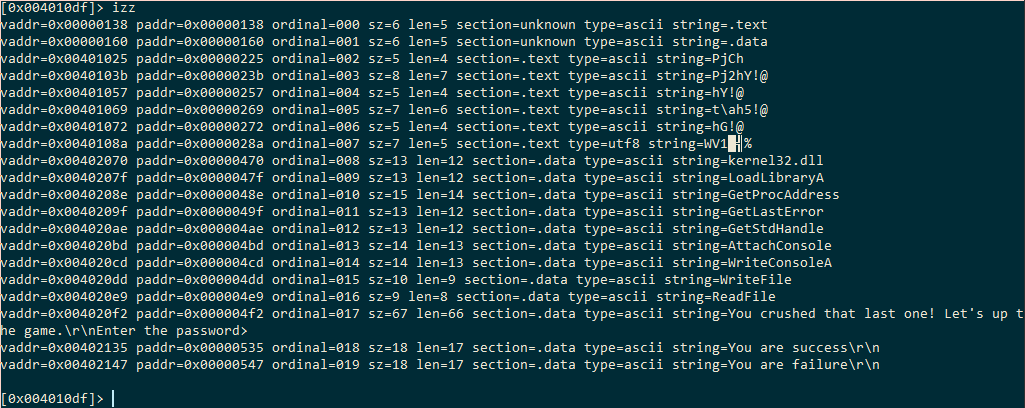
and because we’ve already run some analysis (-A), we can examine xrefs to the clearly interesting string of “You are success” and “Enter the password>”
XREF to Enter the password
We might want to set a flag, or alias to the address of interest (the address where the Enter the password string is), but we don’t have to in this case because r2 has already done that for us.
We examine the flag spaces, select the strings flag space, and see what’s in there (redundant here, but good to be aware of) tab-completing our way to victory:
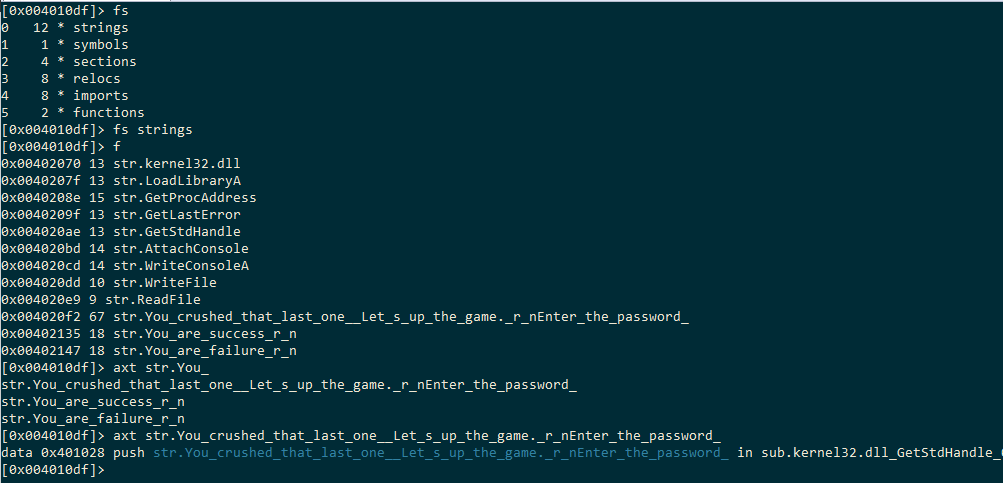
Let’s investigate the function that is using this string to learn a little more about this binary.
We seek to the function of interest, and enter visual mode:
[0x004010df]> s sub.kernel32.dll_GetStdHandle_0
[0x00401000]> VV
We press p or P to cycle through the different display modes (pretty much everywhere in r2 you can press ? to see what commands are available, and commands that have subcommands/modes also accept a ?)
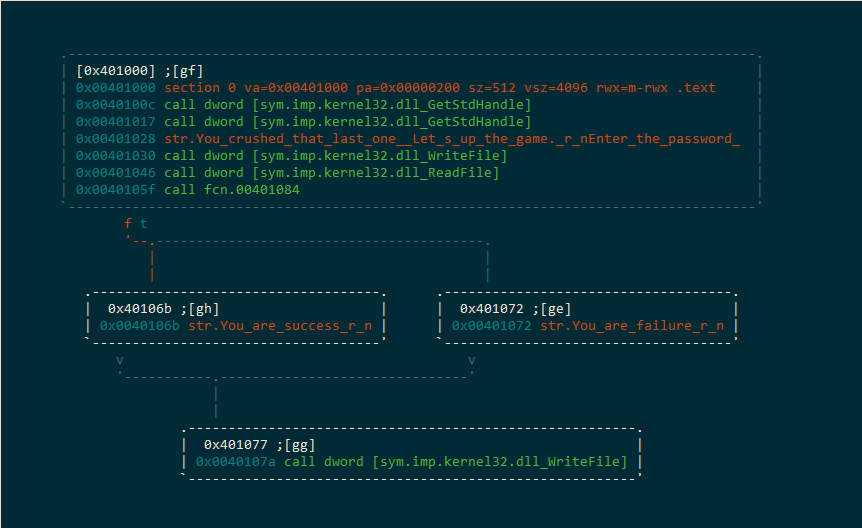
It seems fairly clear…whatever we input will be validated inside of fcn.00401084, and the return value will determine whether we get the nice message or the bad one.
(It might be worth your while to tab/TAB around, zoom (+, -), check out the other graph views p/P, the pseudo-assembly ($), and just practice moving around hjkl (left, down, up, right) to make your r2 experience a little more comfortable.)
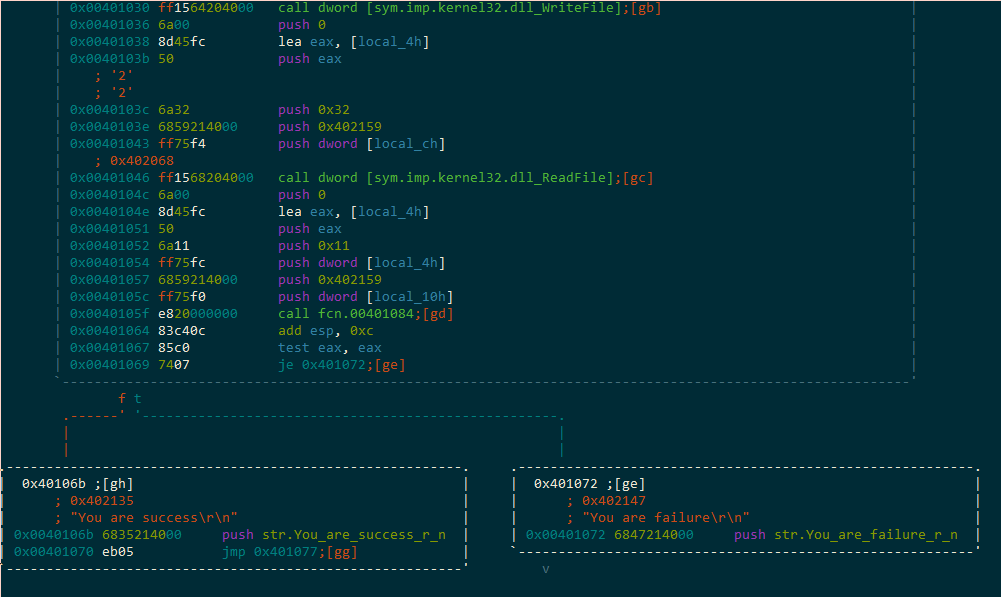
Before we dig into the flag validation routine, we take note of the arguments to the imported ReadFile call:
BOOL WINAPI ReadFile(
  _In_        HANDLE       hFile,
  _Out_       LPVOID       lpBuffer,
  _In_        DWORD        nNumberOfBytesToRead,
  _Out_opt_   LPDWORD      lpNumberOfBytesRead,
  _Inout_opt_ LPOVERLAPPED lpOverlapped
);
I like to imagine all the pushed args as a tower sitting above the function call. Then I knock that tower over and the arguments fall into their respective places.
The following illustration should make this clear:
push arg3
push arg2
push arg1
call a

            push arg3
        push arg2
    push arg1
call a(arg1, arg2, arg3)
you’re welcome!
So, we’ll be reading from stdin, into 0x402159, a maximum of 0x32 bytes
With that in mind, we rename some variables, and create a flag at the buffer location of our input.
Press : to access the command line
> afvn local_ch hStdIn
> f theGuess 0x32 @0x402159
and press enter or ctrl+c to quit the command prompt
one mystery remains…the local_10h being passed into the flag validation routine…what is it?
We access the command line again : and look at where the variables are being written:
:> afvW
 local_10h  0x401007
    hStdIn  0x401012
  local_8h  0x40101d
  inputLen
we scroll up a bit to that location (k), and we see the following disassembly:
0x00401000 58             pop eax
0x00401001 55             push ebp
0x00401002 89e5           mov ebp, esp
0x00401004 83ec10         sub esp, 0x10
0x00401007 8945f0         mov dword [local_10h], eax
0x0040100a 6af6           push 0xfffffffffffffff6
that’s an interesting function prologue…it starts with a pop eax. Whatever was at the top of the stack when we entered this function is what will be placed into eax, and shortly thereafter…local_10h.
We’d usually expect a return address at the top of the stack. When the previous function called this one, the call instruction sets EIP to the beginning of this function and pushes the address of whatever was after the call instruction onto the stack.
We press x to see where this function…wait, let’s rename it first, press d and let’s call it main.
Now we can press x, or seek using the command prompt and s <address listed at the CALL XREF at the top of this function>
I choose x:
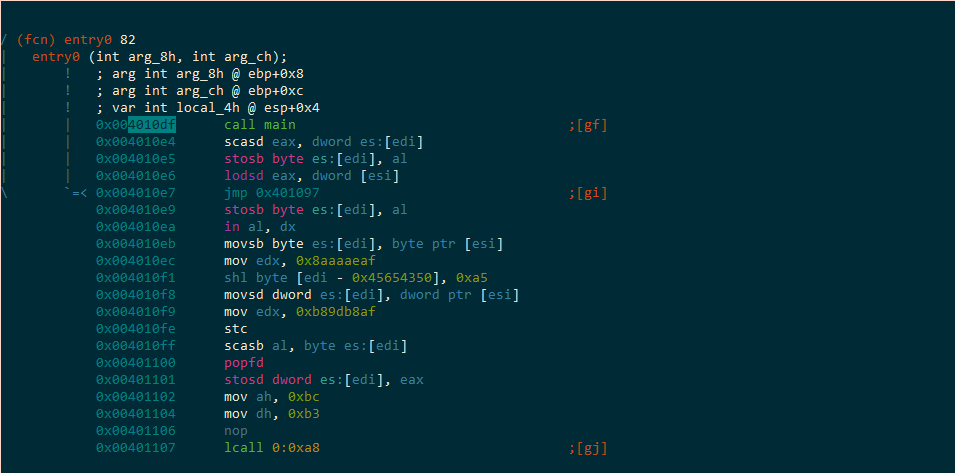
The instructions don’t really make a whole lot of sense following the call, so let’s examine a hexdump and see if there’s anything recognizable:
Press <enter> to return to Visual mode.
:> px 20 @0x4010e4
- offset -   0 1  2 3  4 5  6 7  8 9  A B  C D  E F  0123456789ABCDEF
0x004010e4  afaa adeb aeaa eca4 baaf aeaa 8ac0 a7b0  ................
0x004010f4  bc9a baa5                                ....
:>
hmm…well, bytes are bytes. We rename local_10h to someBytes.
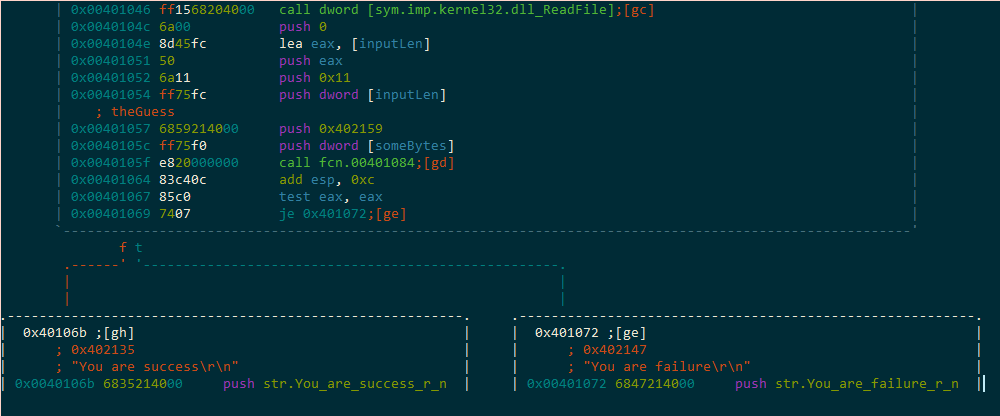
With things renamed, and knowing what’s going into the flag validation routine, and what we want to return with (a non-zero eax), we step inside the flag validation routine using the [gd] shortcut that radare has provided. We literally just type gd.
We rename this function to flagValidator. It seems that this function only takes 3 args. So we rename them according to what we knew was pushed onto the stack before this call.
It looks like our input length should be at least 0x25 characters. Otherwise, we end up at (press t to follow the true branch) the basic block which xor eax, eax before moving to the block that returns to main.
Press u to return to the basic block we were just at.
If we pass the length check, we follow the false branch.
The [gc] block will initialize the loop:
esi receives our input guess edi receives the mystery bytes and ecx currently still holds the length of our input, which is now used to index into the mystery bytes…. mysteryBytes[inputLen - 1]. Essentially, edi points to the last byte of the mysteryBytes
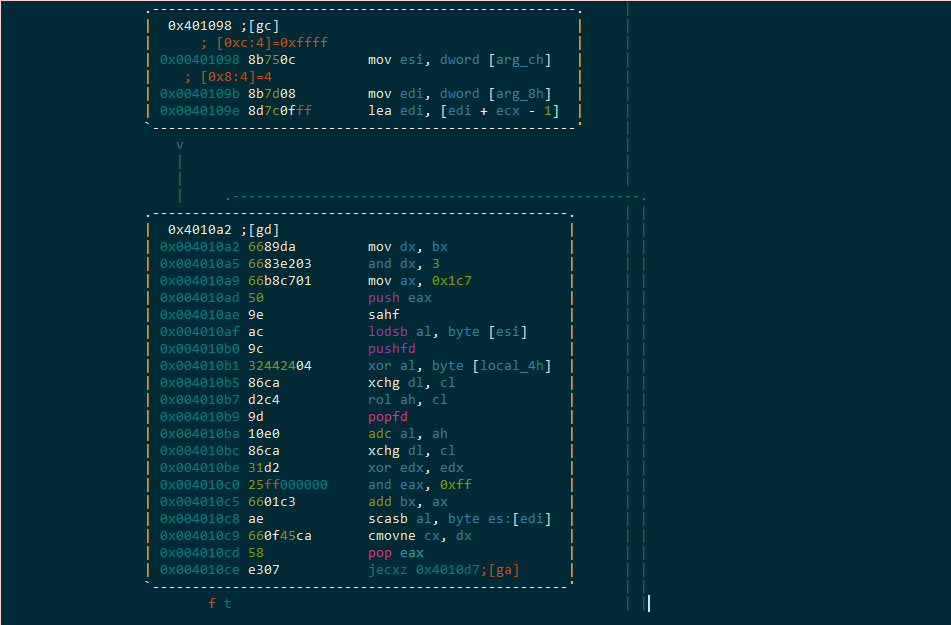
…then a bunch of ugly stuff happens inside of the next block, [gd].
If the condition at the end…jecxz, is true then we go to the fail block [ga] which will zero out eax and return. This instruction is exactly what it sounds like, jump if ecx is zero. Okay, maybe it didn’t sound like anything, but it makes sense after the fact, right?
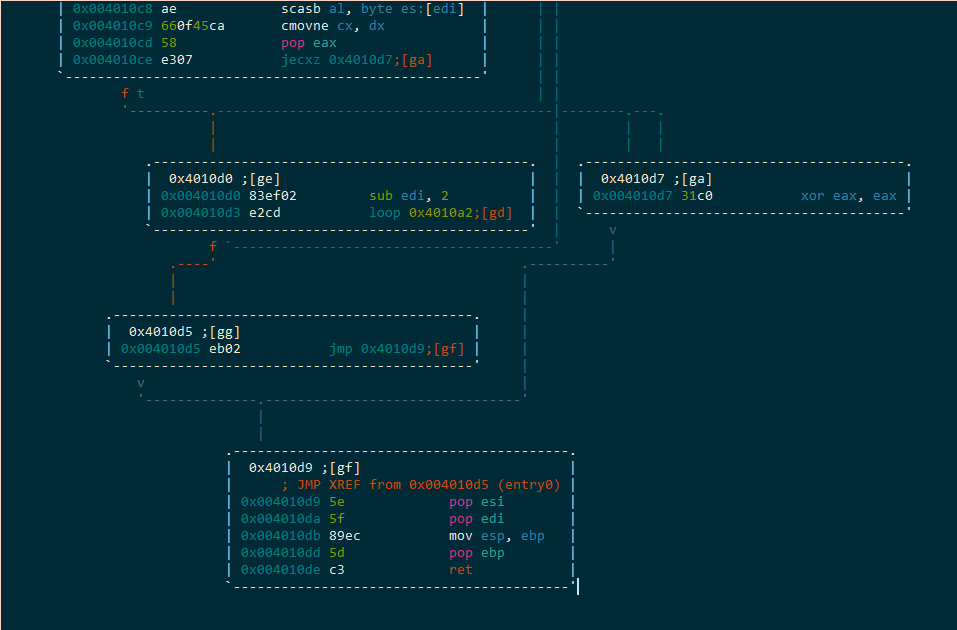
So…there’s only one good way out of this function and that’s through the loop instruction at 0x4010d3. So we will have to survive each iteration of the loop without ecx ever being zero. This depends on the sneaky scasb.
0x004010bc 86ca           xchg dl, cl
0x004010be 31d2           xor edx, edx
0x004010c0 25ff000000     and eax, 0xff
0x004010c5 6601c3         add bx, ax
0x004010c8 ae             scasb al, byte es:[edi]
0x004010c9 660f45ca       cmovne cx, dx
0x004010cd 58             pop eax
0x004010ce e307           jecxz 0x4010d7;[ga]
if the scan string comparison ever fails between al and edi, then the conditional move if not equal (cmovne) will make sure that freshly xor’d edx will put a zero in cx and we will fail.
Ok…here is the interesting part, and what you all came to see. How do we solve this problem.
I will present four…count ‘em 4 gorgeous methods (sort of):
- Symbolic execution + SMT solver (angr w/z3)
- Emulation bruteforce (Unicorn)
- Side-channel attack (Pintool wintool)
- Reverse the algorithm (brain + python)
Method 1: Symbolic execution + SMT solver (angr w/z3)
Some background reading and a de-scarying of symbolic execution, if you so desire:
Quick introduction into SAT/SMT solvers and symbolic execution
lots of great stuff on both of those sites, be sure to explore some rabbit holes and follow along with your hands on some python+binaries.
We have just about everything we need to start writing our angr script. Let’s review:
The function of interest takes three arguments:
- the mystery bytes that live at the address popped into eax at the start of main
- our input guess
- the length of our input guess
We know the values for 2 of those things.
Grab the mystery bytes:
:> s 0x4010e4
:> wt?
|Usage: wt[a] file [size] Write 'size' bytes in current blok to 'file'
| wta [filename]         append to 'filename'
| wtf [filename] [size]  write to file (see also 'wxf' and 'wf?')
| wtf! [filename]        write to file from current address to eof
:> wtf magicBytes 0x25
dumped 0x25 bytes
Dumped 37 bytes from 0x004010e4 into magicBytes
(Note: Since this buffer is of a manageable size, we could have printed the bytes as an escaped hex string…or various other formats. See the print p command for more options. We’ll explore this in Method #2.)
Let’s win:
#!/usr/bin/env python
import angr


# load the binary
b = angr.Project("very_success.exe", load_options={"auto_load_libs":False})

# create a blank_state (https://github.com/angr/angr-doc/blob/master/docs/toplevel.md#the-factory) at the top of the flag checking function
s = b.factory.blank_state(addr=0x401084)

# Since we started inside this function, we have to set up the args that were pushed on to the stack from the previous function
# ...0 sounds like a good place to store memory, why not? So esp+4 (arg0) shall point to the address 0
s.mem[s.regs.esp+4:].dword = 0
# and why not...next arg was at 100
s.mem[s.regs.esp+8:].dword = 100
# next arg at 200? ok!
s.mem[s.regs.esp+0xC:].dword = 200

# we know the length of the winning input
magicLen = 0x25

# and we know what the magicBytes are

magicBytes = open('magicBytes', 'rb').read()


# let's load them into memory at address 0 as bit vector values
s.memory.store(0, s.se.BVV(magicBytes))
# we'll load the second arg into memory at 100
# using a symbolic BitVector (https://github.com/angr/angr-doc/blob/master/docs/claripy.md#claripy-asts)
s.memory.store(100, s.se.BVS("guess", magicLen*8))
# and we can store our magicLen using 32 bits at 200
s.memory.store(200, s.se.BVV(magicLen, 32))


# instantiate a path_group (https://github.com/angr/angr-doc/blob/master/docs/pathgroups.md)
pg = b.factory.path_group(s)

# ask them to explore until they find the winning basic block, and avoid the xor eax, eax block
pg.explore(find=0x4010d5, avoid=0x4010d7)


# for those paths which have found a way to the desired address...let's examine their state
for found in pg.found:
    # specifically, let's see what string is in memory at 100 for successful paths
    print found.state.se.any_str(found.state.memory.load(100, 0x25)).strip('\0')
and then:
# ./very_angr.py
WARNING | 2017-08-10 00:04:30,040 | cle.pe | The PE module is not well-supported. Good luck!
a_Little_b1t_harder_plez@flare-on.com
Knowing the flag format, (printable ascii, ending in @flare-on.com), we could have added some contraints to speed things up. See angr-doc for some examples.
Method 2: Emulation bruteforce (Unicorn)
This probably isn’t the most elegant approach, but it’s nice to have at least an introduction to another powerful tool.
First, we need the bytes of the code we want to emulate.
We seek to the flagValidator function and ask r2 for some information about this function…namely, we want to know the size:
:> s flagValidator
:> s
0x401084
:> afi ~size
size: 91
ok, let’s grab those bytes then. Instead of a file, let’s just grab the string:
:> pcs 91
"\x55\x89\xe5\x83\xec\x00\x57\x56\x31\xdb\xb9\x25\x00\x00\x00\x39\x4d\x10\x7c\x3f\x8b\x75\x0c\x8b\x7d\x08\x8d\x7c\x0f\xff\x66\x89\xda\x66\x83\xe2\x03\x66\xb8\xc7\x01\x50\x9e\xac\x9c\x32\x44\x24\x04\x86\xca\xd2\xc4\x9d\x10\xe0\x86\xca\x31\xd2\x25\xff\x00\x00\x00\x66\x01\xc3\xae\x66\x0f\x45\xca\x58\xe3\x07\x83\xef\x02\xe2\xcd\xeb\x02\x31\xc0\x5e\x5f\x89\xec\x5d\xc3"
looks pretty good…starts with the prologue, ends with a c3 (ret).
Since this is a little more convenient than the magicBytes file, let’s grab the magicBytes as a string as well:
:> s 0x4010e4
:> pcs 0x25
"\xaf\xaa\xad\xeb\xae\xaa\xec\xa4\xba\xaf\xae\xaa\x8a\xc0\xa7\xb0\xbc\x9a\xba\xa5\xa5\xba\xaf\xb8\x9d\xb8\xf9\xae\x9d\xab\xb4\xbc\xb6\xb3\x90\x9a\xa8"
We’re ready to start our script:
#!/usr/bin/env python

# lots of good help from these awesome scripts/examples/blogs

#https://github.com/unicorn-engine/unicorn/blob/master/bindings/python/sample_x86.py#L24
#https://r3v3rs3r.wordpress.com/2015/12/12/unicorn-vs-malware/
#https://github.com/karttoon/shellbug
#https://github.com/unicorn-engine/unicorn/issues/451

from unicorn import *
from unicorn.x86_const import *

# taking a lazy approach to automation and wrapping the entire thing in a loop

rightChars = 0

# dummy string to guess with
guessString = list("!" * 0x25)

# and setting our win state
foundIt = False

while not foundIt:

    for c in xrange(0x20, 0x7F):
        guessString[rightChars] = chr(c)

        # creating a custom hook for every instruction that executes
        # a brutish approach, but it'll work
        def hook_code(uc, address, size, user_data):
            global rightChars
            global foundIt

            # if we have already executed the cmovne cx, dx, and cx is zero...
            # then this input is bad and we need to try a different one
            # :> ? 0x4010cd - 0x401084
            # 73 0x49 0111 73 0000:0049 73 "I" 01001001 73.0 73.000000f 73.000000

            if address == 0x49:
                ecx = uc.reg_read(UC_X86_REG_ECX)
                # we got hit with the cmovne, it was a bad guess
                if ecx == 0:
                    mu.emu_stop()
                # we managed to loop all the way to the last character...we won
                elif ecx == 1:
                    foundIt = True
                    mu.emu_stop()
                # if loop count and number of characters we already found match, we move on
                elif ecx == 0x25 - rightChars:
                    #print ("Found One!")
                    #print (uc.mem_read(guessAddress+rightChars, 1))
                    rightChars += 1

        # spawn a unicorn thing
        mu = Uc(UC_ARCH_X86, UC_MODE_32)

        # some generic addresses for our emulation
        baseAddress = 0
        STACK_ADDRESS = 0xffff000
        STACK_SIZE = 0x1000

        # function code
        functionCode = "\x55\x89\xe5\x83\xec\x00\x57\x56\x31\xdb\xb9\x25\x00\x00\x00\x39\x4d\x10\x7c\x3f\x8b\x75\x0c\x8b\x7d\x08\x8d\x7c\x0f\xff\x66\x89\xda\x66\x83\xe2\x03\x66\xb8\xc7\x01\x50\x9e\xac\x9c\x32\x44\x24\x04\x86\xca\xd2\xc4\x9d\x10\xe0\x86\xca\x31\xd2\x25\xff\x00\x00\x00\x66\x01\xc3\xae\x66\x0f\x45\xca\x58\xe3\x07\x83\xef\x02\xe2\xcd\xeb\x02\x31\xc0\x5e\x5f\x89\xec\x5d\xc3"

        magicBytes = "\xaf\xaa\xad\xeb\xae\xaa\xec\xa4\xba\xaf\xae\xaa\x8a\xc0\xa7\xb0\xbc\x9a\xba\xa5\xa5\xba\xaf\xb8\x9d\xb8\xf9\xae\x9d\xab\xb4\xbc\xb6\xb3\x90\x9a\xa8"

        # map 0x1000  bytes at baseAddress
        mu.mem_map(baseAddress, 0x1000)
        mu.mem_map(STACK_ADDRESS, STACK_SIZE)

        # set our ESP with some room for the previous args to this function
        mu.reg_write(UC_X86_REG_ESP, STACK_ADDRESS + STACK_SIZE - 0x10)

        # address where we want to write the magicBytes
        magicBytesAddress = 0x200

        # write them
        mu.mem_write(magicBytesAddress, magicBytes)

        # address where we want to write our input buffer
        guessAddress = 0x300

        # write it
        mu.mem_write(guessAddress, ''.join(guessString))

        # address where we want to write the magicLen (input length value we discovered)
        magicLenAddress = 0x400

        # its value
        magicLen = 0x25

        # write it
        mu.mem_write(magicLenAddress, str(magicLen))

        # "push" our args onto the stack (the addresses of our buffers of interest)
        mu.mem_write(STACK_ADDRESS+STACK_SIZE-0xc, "\x00\x02\x00\x00")
        mu.mem_write(STACK_ADDRESS+STACK_SIZE-8,   "\x00\x03\x00\x00")
        mu.mem_write(STACK_ADDRESS+STACK_SIZE-4,   "\x00\x04\x00\x00")

        # write the function code at the base address
        mu.mem_write(baseAddress, functionCode)

        # hook every instruction, because it'll work
        mu.hook_add(UC_HOOK_CODE, hook_code)

        # start the brute
        try:
            mu.emu_start(baseAddress, baseAddress + len(functionCode))
            if foundIt:
                print ''.join(guessString)
                break
        except UcError as e:
            print "Error: %s" % e
and then:
# ./very_emulated.py
a_Little_b1t_harder_plez@flare-on.com
Method 3: Timing attack (Pintool wintool)
This one is very easy to write about because someone has already done the work.
That last script is just some mangling I did to aldeid’s pintool to make it happy with python and windows cmd prompt.
C:\pin>python c:/tools/pintool2-win.py -l 37 -c 6 -a 32 -s ! c:/working-dir/very_success.exe
!!!!!!!!!!!!!!!!!!!!!!!!!!!!!!!!!!!!! = 19488 difference 0 instructions
0!!!!!!!!!!!!!!!!!!!!!!!!!!!!!!!!!!!! = 19488 difference 0 instructions
1!!!!!!!!!!!!!!!!!!!!!!!!!!!!!!!!!!!! = 19488 difference 0 instructions
2!!!!!!!!!!!!!!!!!!!!!!!!!!!!!!!!!!!! = 19488 difference 0 instructions
3!!!!!!!!!!!!!!!!!!!!!!!!!!!!!!!!!!!! = 19488 difference 0 instructions
4!!!!!!!!!!!!!!!!!!!!!!!!!!!!!!!!!!!! = 19488 difference 0 instructions
5!!!!!!!!!!!!!!!!!!!!!!!!!!!!!!!!!!!! = 19488 difference 0 instructions
6!!!!!!!!!!!!!!!!!!!!!!!!!!!!!!!!!!!! = 19488 difference 0 instructions
7!!!!!!!!!!!!!!!!!!!!!!!!!!!!!!!!!!!! = 19488 difference 0 instructions
8!!!!!!!!!!!!!!!!!!!!!!!!!!!!!!!!!!!! = 19488 difference 0 instructions
9!!!!!!!!!!!!!!!!!!!!!!!!!!!!!!!!!!!! = 19488 difference 0 instructions
a!!!!!!!!!!!!!!!!!!!!!!!!!!!!!!!!!!!! = 19510 difference 22 instructions
a!!!!!!!!!!!!!!!!!!!!!!!!!!!!!!!!!!!! = 19510 difference 22 instructions
a!!!!!!!!!!!!!!!!!!!!!!!!!!!!!!!!!!!! = 19510 difference 0 instructions
a0!!!!!!!!!!!!!!!!!!!!!!!!!!!!!!!!!!! = 19510 difference 0 instructions
a1!!!!!!!!!!!!!!!!!!!!!!!!!!!!!!!!!!! = 19510 difference 0 instructions
a2!!!!!!!!!!!!!!!!!!!!!!!!!!!!!!!!!!! = 19510 difference 0 instructions
a3!!!!!!!!!!!!!!!!!!!!!!!!!!!!!!!!!!! = 19510 difference 0 instructions
...
...
a_Little_b1t_harder_plez@flare-on.col = 20280 difference 0 instructions
a_Little_b1t_harder_plez@flare-on.com = 20283 difference 3 instructions
a_Little_b1t_harder_plez@flare-on.com = 20283 difference 3 instructions
Password:  a_Little_b1t_harder_plez@flare-on.com
For all characters except the last, you can clearly see the extra loop in the 22 instruction difference.
Method 4: Reverse the algorithm (brain + python)
I also get this one for free because you can easily find plenty of this kind of writeup with a google query for “very_success.exe”
For example…see this excellent, detailed explanation
References:
- radare2
- ConEmu
- ReadFile
- Function prologue
- x86 jecxz
- x86 loop
- x86 scasb
- doar-e
- Quick introduction into SAT/SMT solvers and symbolic execution
- angr-doc
- Unicorn x86 example
- Unicorn vs Malware
- Shellbug - Shellcode debugger
- Unicorn Issue
- Pin
- Pintool2
- Pintool2 - windows-friendl..ier
- very_success write-up
- theJunkyard